
Hip Replacement
Hip Replacement Resource Hub
Search our comprehensive hip replacement guide for answers on surgery, recovery, and daily life.
Quick Facts
Everything You Need to Know


Experience precision orthopaedics.
Schedule a consultation to discuss your personalised surgical plan.
Diagnosis
Understanding your pain is the first step toward reclaiming your mobility. Explore the causes of hip discomfort and the professional factors we consider before recommending treatment.
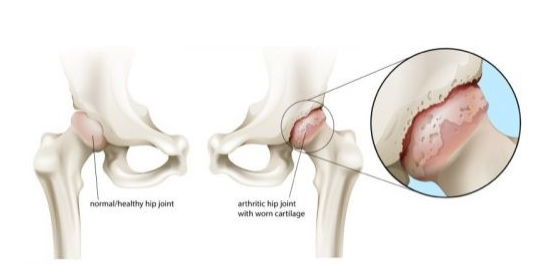
Osteoarthritis of The Hip
What is OA?
Osteoarthritis of the hip joint is the result of loss of cartilage in the hip socket and femoral head. This progressively creates a rough contact between the underlying bone of both bones. This causes pain (usually groin pain) and inflammation of the joint capsule. The body reacts by producing extra bone at the edge of the joint (osteophytes), which reduces mobility.

Causes
Pain around the hip joint can have various causes. It might be referred or radiating pain from the lower back, muscles and bursa surrounding the hip joint or the pain may be from the hip joint itself.
- Decreased hip flexion and range of motion
- Decrease in hip abduction
- Limited hip rotation
- Hip pain and discomfort
In addition to these osteophytes, the main features of osteoarthritis on an X-ray are cysts (cavities) in the bone just below the joint and narrowing of the joint space. The wear and tear of the cartilage layer in the joint is the main reason for performing a hip replacement. There are several causes that can lead to cartilage loss.
The most common are:
- old age
- rheumatoid arthritis
- a previous accident (trauma)
- avascular necrosis
- congenital hip dysplasia
- femoroacetabular impingement (FAI)
Doctors Considerations
Things that your doctor will take into account as part of the diagnosis:
- the duration of the pain,
- how did she start,
- is there nocturnal pain or pain when resting,
- does the pain increase with weight bearing,
- the walking distance,
- can one still get up easily from a low chair or from the car,
- does the pain radiate below the knee.
Groin pain can originate from the hip joint. Pain on the outside of the thigh can have various causes. It should therefore be checked whether the pain originates from the hip joint, has arisen as a result of muscle/tendon or bursa disorders or originates in the lower back. Your doctor will do this on the basis of a clinical examination and a number of technical tests. Paresthesia or tingling in the leg is in the majority of cases due to problems in the lower back. Pain that radiates to below the knee also usually originates in the lower back.
Restricted movement of the hip joint manifests itself in a reduced walking distance, more difficult getting in and out of a low chair or car and difficulty putting on stockings and shoes. Thigh/ groin pains often originate from osteoarthritis (wear and tear) of the hip joint. Limping can occur as a result of wear and tear on the hip joint or as a result of inflammation or tearing of the gluteal muscles. A painful, audible or visible click, in the majority of cases, occurs as a result of a tendon jumping over a bony prominence. The ‘clicking’ often occurs with movement and can sometimes be provoked.
It is important that you can clearly indicate when, where and with which movements you experience discomfort.
Hip Anatomy
A Healthy Hip Joint

To properly understand a disorder of the hip joint, it is important to know how a normal hip joint is constructed. A joint is a place in the human body where 2 bone ends come together and where movement can take place. The hip joint is described as a ball-and-socket joint that is made up of the round head of the thigh (femoral head or caput femoris) and the hip socket (the acetabulum), which is part of the pelvis.
The hip joint is made up of different layers in order to achieve a stable and functional joint. The deepest layer contains the bone structures with the spherical femoral head (caput femoris) of the upper leg (femur) on the one hand and the hip socket (acetabulum) on the other. The femoral head and socket are covered with a cartilage layer that allows them to move smoothly in relation to each other and absorb shock. The labrum surrounds the hip socket. This structure creates an extra depth of the hip socket. The femoral head is connected to the rest of the thigh via a short neck with a bony prominence at the end (the greater trochanter) to which several major muscles attach. The greater trochanter is the bone that can be felt on the side of the thigh. The next layer consists of the hip capsule that surrounds the joint and the ligaments that provide stability to the joint. They connect the hip socket to the upper leg.
Tendons are structures that connect muscle to bone, allowing movement. On the outside of the thigh is the tensor fascia lata with the iliotibial band as an extension. At the rear, the three gluteus muscles form the buttock and provide sideways (abduction – away from the body) and backward (extension or stretch) movement. They also stabilize the pelvis when walking. Limping can be a result of damage (inflammation or tearing) of these muscles. On the inside are the adductors, which move the leg sideways inwards. The iliopsoas and the rectus femoris are 2 muscles that allow us to raise our leg (flexion or bending).
There are also the external rotators that run from the pelvis to the back of the thigh and ensure an external rotation of the leg (the outward rotation of the knee and foot) and play an important role in the dynamic stabilization of the hip joint. Finally, at the back are the hamstrings that contribute to stretching the leg together with the gluteus muscles. All the nerves between the spine and the lower limb run along the hip joint. The three main ones are the femoral nerve, which runs on the front of the thigh, the obturator nerve on the inner side, and the sciatic nerve, which runs on the back.
The nerves are responsible for controlling the muscles and transmitting information to the brain about sensation, orientation in space and pain. Finally, there are two more important bursas; the bursa trochanterica and the iliopsoas bursa. These bursae are located where there is friction between bone and tendons. A bursa has the function of reducing friction between both structures. When inflamed, these structures give rise to pain.
YouTube Tutorial
Treatment Options
Non-Surgical Options
A conservative (without surgery) policy is always started in which pain medication plays an important role.
This will often have already been initiated by your GP. Paracetamol is a good painkiller that is certainly useful in the initial phase of osteoarthritis. When pain flares up, an anti-inflammatory (NSAID) can bring relief for a short period (2-3 weeks). An NSAID should not be taken for a long time because of the risk of stomach ulcers/bleeding and damage to the kidneys. Glucosamine preparations have no proven general effect, but some respond very well to this. They certainly cause no harm. This is often combined with physiotherapy to keep the hip joint flexible and to teach muscle-strengthening exercises.
In patients with moderate to mild signs of osteoarthritis, infiltrations in the joint can be considered. An anesthetic and a small amount of cortisone or hyaluronic acid preparation is injected in the hip joint.
The injection into the joint is performed in the operating room with radiographic control to check the position of the needle to ensure that it is intra-articular. If previous remedies no longer help and the stiffness and pain increase, a total hip replacement (THR) is the definitive treatment.
Hip Replacement

Procedure
Precision meets innovation. Discover how modern prosthetics and Mako™ Robotic-Arm Assisted Technology are used to rebuild your hip with millimetre-accuracy.
Hip Replacement
What Is a Hip Replacement?
To explain what a hip replacement is, you first need to know what a normal hip joint looks like.
The hip joint is a ball-and-socket joint that consists of two parts:
• the round head of the femur (femoral head or caput femoris)
• the hollow socket of the hip (hip socket or acetabulum)
The head and socket are lined with cartilage that allows them to move smoothly in relation to each other and absorb shock. In addition to the support that the head finds in the socket, the joint is also held in place by a capsule and a sheath of buttock and hip muscles


Fig. Total hip replacement Xray
Different Types of Hip Prosthesis
The first type is the cemented hip prosthesis. Bone cement is used as a filler to fix the implant in the bone.
A second type is the uncemented hip prosthesis. In this type, the implant will grow into the bone. In some cases, an additional screw fixation of the acetabulum is necessary for extra stabilization. In this type, the operated leg must be relieved somewhat during the initial period of rehabilitation by using crutches.
The two previous techniques can also be combined with each other, for example in which the hip socket is an ingrown prosthesis (uncemented) and the stem of the hip prosthesis is fixed with bone cement(cemented).

Different Approaches
Direct Anterior vs Posterior Approach
A hip prosthesis is placed through an incision on the thigh. There are several access routes to the hip joint.
The two options mainly used are the Direct Anterior Approach and the Posterior Approach.
Direct anterior approach (DAA)
This inter-nervous, muscular sparing approach has several theoretical advantages which include:
– Accurate restoration of leg length
– Muscle sparing approach
– Earlier mobilization without restrictions
– Quicker recovery in the first 6 weeks
– Less risk of dislocation
– Added benefit of intra- operative fluoroscopy
– Smaller incision with less scarring
These benefits can lead to a potential quicker recovery post operatively. No muscles are detached when using this technique. This technique is mainly used for placing the classic hip prosthesis.

Posterior approach for total hip replacement
The posterior approach utilizes an incision of about 10 to 15 cm is made on the posterior side of the thigh.
It is also possible to perform a mini-invasive access route in which less muscles need to be loosened. This has the advantage that the rehabilitation goes a little more smoothly during the first weeks.
The optimal approach and which type of hip prosthesis is best for you will be discussed during consultation.
Mako Smart Robotics
YouTube Video 1
YouTube Video 2
Risks & Safety Protocols
Possible Complications of Hip Replacement
The placement of a hip prosthesis usually goes very smoothly. More than 95% of patients are very satisfied and feel excellent after the operation. But as with all operations, there is a risk of complications with hip surgery. Most procedures today are highly standardized to minimize the risk of complications. Yet they can never be completely ruled out. For the sake of completeness, a summary of all possible complications follows below.
For an infection of the wound or of the underlying material, treatment with antibiotics is recommended. Often a new operation is also necessary, which does not benefit the result of the initial procedure. That is why it is important, especially in the case of prosthesis surgery, to wash before the operation with the disinfectant soap and to strictly apply correct wound care after the operation.
A superficial thrombophlebitis is an inflammation of the superficial veins or veins. This is transient and usually no specific therapy is started for it.
Deep vein thrombosis (DVT) is a blood clot (thrombus) in the deep veins or veins of the leg. There is always an increased risk of DVT after surgery. To limit this risk, you will receive white TED stockings and also medication via pills or syringes in your abdomen.
Movement is also very important. A patient who moves a lot and regularly tenses the muscles has a significantly lower level of complication. To prevent bleeding after surgery, a drain is sometimes left in the area of operation. This will be removed before discharge. Bleeding will often stop spontaneously. If you have lost too much blood, you will receive a blood transfusion.
Nerve injuries can occur as a result of actions during surgery. Often this is a temporary phenomenon that will improve spontaneously. If you experience sensory disturbances, let the doctor know.
There are a number of specific points of attention for a hip prosthesis:
A hip replacement can dislocate, a very rare complication in the placement of a first hip replacement. The cause of the luxation is still being sought. If this is the first time, the prosthesis is reduced back into place via a short anaesthetic. If it occurs several times, there is often an underlying reason and you will need to have another operation. There is also a risk of a periprosthetic fracture, which can be a fracture in your femur or acetabulum after placement of the prosthesis. This can be dealt with by various techniques and fixation devices and could potentially prolong your rehabilitation.
A small leg length difference is sometimes unavoidable to achieve a stable configuration for your hip replacement. If you are inconvenienced by this, this can be remedied by an arch support or a build up shoe.
Always contact a doctor if you have any of the following problems: fever, increasing swelling, warmth or progressive pain, redness, a running wound, functional problems or if you suddenly become short of breath.
Fig. Total hip replacement Xray
Revision of Hip Prosthesis
A hip replacement can wear out over time or certain parts can become loose. Because the prosthesis is made up of different parts, it is possible to replace only the damaged parts. The hip prosthesis is, as it were, restored. The course of the rehabilitation depends of course on the parts that need to be replaced. We know from research that for every 100 hip replacements fitted, 95 have excellent results with no parts needing to be replaced after a period of 15 years. With a hip replacement you can expect that the pain from before the operation has disappeared, or at least has become much less. The mobility of the joint remains about the same as before the operation. How flexible the hip becomes after surgery is strongly determined by how much and how well you exercise afterwards. As soon as you have healed after placing your prosthesis, you can walk again, including long distances, and you can cycle and swim. In addition, if you have performed your rehabilitation exercises well, you will eventually be allowed to do some sports to a limited extent, such as playing double tennis, cross-country skiing and golf. Prolonged shock loads such as walking and jumping or movements involving extreme flexion of the hip should be avoided.
Important: The surgeon decides in consultation with you which type of prosthesis is best for you.
A general discussion of a hip revision is very difficult because it often varies greatly on a case-by-case basis. A hip revision is indicated in case of failure of a primary (first) hip arthroplasty. There are several reasons why a primary hip replacement can fail over time. The most common causes are contamination (infection) of the prosthesis material, loosening of the prosthesis material, wear of the sliding surfaces of the prosthesis material or repeated luxation of the prosthesis. If there are no signs of infection, the worn or loose parts can be replaced in the same operation (revision in 1 time). If there are signs of infection, the material present must be removed. Sometimes it is necessary to make an artificial fracture of the upper leg. Afterwards, antibiotics must be taken for a number of weeks (usually 6). Your doctor will therefore closely monitor your blood results. Once everything is normalized, the new components can be installed (revision in 2 times). It should be taken into account that in most cases rehabilitation is a lot more difficult and a longer length of hospitalization can be expected than with a classic hip arthroplasty. In some cases, your doctor will ask you not to support yourself on the operated leg for several months (usually a maximum of 3).
Care Expert
CARE EXPERT is an organization that is specially equipped for patients who receive a new knee or hip prosthesis.
To prepare you as well as possible, we have developed the CARE EXPERT Path. You will be well informed in advance and also screened so that you, and the care providers in the hospital, are optimally prepared for your operation and your rehabilitation.
You will come to the hospital about 2 weeks before your operation and will be seen by several CARE EXPERT employees. The type of anesthesia can be discussed with the anesthesiologist. You will also be informed about the rehabilitation after your operation. It ends with a short practice session by the rehabilitation service. All this information will help to prepare you for your operation as well as possible.
Prep & Recovery
The roadmap to your new life. What to expect from your hospital stay, how to prepare your home, and the milestones of your rehabilitation journey.
Hospital Stay
Admission
During the information session, we will let you know when and at what time you are expected at the hospital for admission.
What To Bring To Hospital
In addition to the usual items such as identity card, nightwear and toiletries:
- the medicines you use at home (a list and the dosages)
- comfortable clothing that allows you to free your upper leg.
- comfortable shoes with a non-slip sole (secure fit)
- 1 pair of crutches (Available in hospital)
- contact phone numbers
- possible allergy list
Dental prostheses, jewelry, nail polish and make-up are removed. It is best not to bring money and jewelry to the hospital.
Important Information
You may eat normally or monitor your diet until the day before the procedure. If the operation takes place in the morning, you may not eat or drink from midnight
To prevent infection, it is important that you wash yourself thoroughly before your admission.
You can also prepare your home for your rehabilitation.
Remove loose carpets. Place objects that you use every day at table height. The first week after the operation, bending forward will not go smoothly. A raised toilet or seat can sometimes be helpful. If necessary, have a bed placed downstairs. If necessary, you can raise your bed with an extra mattress or blocks.
Tell your specialist if you are taking blood-thinning medicines (Disprin/warfarin). In consultation with your doctor, it will be decided whether you should temporarily replace it and when you should stop it before the operation and what you should receive as a replacement.
Anaesthesia
The day of surgery you will be put on a surgical gown and the nurse will take you from the ward to the preparation area of the operating theatre in your bed.
An IV is inserted in the operating room. The anesthesiologist will then start anesthesia. The anesthesia can be general or you can choose to anesthetize only the lower extremities via an epidural. If you have any questions about this, you can ask the anesthesiologist the week before the operation. You can get a sedative to sleep peacefully. The pain relief that you receive during and after the operation goes through an intravenous catheter directly into a vein, so that the pain is controlled. You will be given antibiotics during the operation to minimize the risk of infection. Your doctor will also prescribe blood-thinning medication to prevent thrombosis (= clotting of the blood). It is colder in the preparation room than in the ward. If you are cold, you can ask for an extra blanket. You will be asked several times which side (left or right) will be operated on. An arrow will also be placed on the leg to be operated on.
Placing The Hip Prosthesis
During the procedure, the diseased hip joint is replaced by a prosthetic joint. The procedure starts with an incision in the skin. The hip joint is exposed through this surgical wound. The damaged femoral head is removed. The acetabulum is gradually enlarged until the prepared cavity is adapted to the shape and dimensions of the prosthesis. The new acetabulum is placed in the cavity and, depending on the type, fixed with bone cement or pressure. The femur is prepared with a number of instruments for the stem of the prosthesis, which may or may not be fixed with bone cement. The implanted shaft is then fitted with a head that fits into the new hip socket. Before placing the final components, test components are tested to find the best size for your joint. The operation takes about an hour and a half to two hours.
After the Operation
Hospital Recovery
You will remain under the supervision of the anesthetist and nurse in the recovery room for a few hours. Painkillers were started during the operation. When you are awake and your pain is sufficiently controlled, you can go to your room or high care/ICU depending on the pre- operative plan.
Day 1
The first day after surgery, all catheters are removed. Afterwards you will be guided in your first steps with crutches or a walker in your room. The hip may usually be put on full weight bearing immediately, aided by two crutches. The physiotherapist and the occupational therapist help you in a comfortable chair, which you can put in a relaxing position. You will usually experience pain after the operation, but the nurse will check regularly – both during the day and at night – whether the pain is sufficiently under control. The surgeon and the anesthesiologist give advice for pain management and the necessary instructions to the nurse. The nurse will also check your blood pressure, pulse, temperature and dressing.
Day 2
From now on you will go to therapy on the ward in normal clothing in the morning and afternoon. You will receive the exercises in an exercise room under the guidance of an experienced physiotherapist or occupational therapist. You start with the exercises that the physio advises and you receive instructions on how to walk with crutches. Exercises are added day after day.
Day 3
From the third day, you will be able to climb and descend a flight of stairs using crutches. The physio will teach you the best method to safely resume your daily activities independently. From this day, discharge from the hospital is possible.
Visiting hours
Try to limit your visit. You could still use a rest break.
What documents do you receive upon dismissal?
- A letter of discharge
- Injections for the prevention of deep vein thromboses (thromboprophylaxis) for a period of 30 days.
- wearing the support stocking, also for a period of 30 days
- instructions regarding wound care
- physiotherapeutic instructions
- the contact details of our service.
- An appointment for the first consultation, approximately two and six weeks after the procedure.
At Home Recovery
You may return home once your medical treatment has ended. The average length of stay in hospital is 3 to 4 days, but of course depends on the healing of your wound, your general recovery and rehabilitation. The doctor will monitor the use of blood thinners when you return home. You will receive further physio guidance as an outpatient. The wound should be kept dry and clean for 14 days. The bandage does not need to be changed daily.
About two weeks after the operation, the sutures will be cut by your doctor. It is possible that the wound looks red and the wound area feels warm. You don’t have to worry about this. An initial postoperative check-up with your orthopedic surgeon is scheduled two weeks after surgery. This appointment will be arranged upon your discharge.
Once you return home, the rehabilitation continues for a few weeks at home under the supervision of your physiotherapist. Mobility will be increased step by step and the use of crutches will be reduced. Your physiotherapist will guide you in this. You may cycle as soon as the hip can bend sufficiently again. Re-sports and other hobbies are possible provided that the hip is not stressed or strained. Always discuss this with your physiotherapist and your surgeon. The more you exercise at home, the faster you will progress in agility and strength. In between practicing it is important that you also plan moments of rest and recovery. The exercise program will be gradually expanded by your physiotherapist. They will tell you more about this as soon as you return home.
FAQ
Clear answers for a confident journey. We address the most common patient questions regarding lifestyle, safety, and long-term results.
How is the surgical wound treated?
There are several ways to close the surgical wound: with hooks, thread or subcutaneous suture with 2 loops at the ends of the wound. The wound should be kept dry and clean for 14 days. The bandage certainly does not need to be changed daily. If there are blisters, red edges or a discharge, inform the nurse. He/she can assess the wound and recommend early consultation with your surgeon if necessary.
Do I have to go on a diet or is special food recommended?
No, there are no dietary restrictions. Back in the room, in consultation with the head nurse and the doctor, it will be decided when you can eat normally again. You will usually have a light meal in the evening after the operation and you can usually have a normal meal the day after the operation. Keep in mind that some painkillers can suppress appetite or cause nausea.
Can I drive?
For safety reasons, it is best not to drive a car yourself until after the check-up with your doctor, which is usually six weeks after the procedure. After all, you must always be able to perform an emergency stop by law. This measure is therefore not intended to take away your freedom, but rather to protect you.
Is travel allowed?
It is best to wait until about six weeks after the procedure. Keep in mind that some aids such as crutches or walking sticks are still necessary.
What about sexual activity?
Sexual activity is possible as soon as you feel capable. Your physiotherapist or your doctor can answer any questions about this.
Activities?
There are exercises that are mainly intended for the first days after surgery and exercises for later, when you are back home. You are not supposed to start new exercises on your own initiative. You can discuss this with your physiotherapist. You may find it difficult to tighten your front thigh muscle. That is why a muscle stimulus is administered every day to help you strengthen this muscle. In general, you practice almost every hour during the first days and this is reduced to two to three times a day in a later phase. You may feel some stretch while exercising and you may experience some fatigue. However, never exaggerate. In the first place, it is important that you can walk back with an aid (walking frame or crutches). Do this as often as pain and fatigue allow. In case of severe pain and/or swelling, you should take some rest. You can then also place some ice in the groin and against the side of the leg. If necessary, take it easy for a day. It is also important that you take regular, deep breaths in and out on the day of surgery and the day after. In this way you stimulate your breathing during the period in which you are mainly lying or sitting. Each exercise may be repeated five to ten times, within the pain threshold. Avoid exercises that are too difficult or too painful.
Life After Surgery
General Guidelines for a Hip Replacement
Life with a hip prosthesis is – certainly in the beginning – a change for you and your environment. It allows you to resume your normal daily activities.
Here we give you tips that can serve as a guideline for further good rehabilitation.
After a hip prosthesis has been placed, the main aim is to regain normal mobility and strength. That is why you try to resume your daily activities as soon as possible, such as walking, getting in and out of bed, toilet, …
It is wise to think of any pain as a measure of the pressure you are putting on the hip. If the hip area feels sore, swollen, or hot, it could be a sign that
you have done too much. Try to adjust both the load and your activities (how often you step, what distance you walk). Regular rest breaks are recommended. Then make sure that your leg is slightly higher. Rest breaks are just as important as the exercise.
Inadvisable Postures for Hip Prosthesis
The following positions should be avoided in the first months after surgery to avoid dislocation of the hip replacement.
- Crossing the legs
- Never place your operated leg beyond the midline
- Rotary movement
When walking, it is better to turn step by step – preferably not on the operated leg – always lifting the feet. When sitting, it is better not to sit cross legged on a chair.
If you are sitting on a chair (e.g. when washing or dressing), it is better not to bend forward towards your feet
Walking With Crutches
After the operation, you may immediately fully support the operated leg, unless your surgeon informs you otherwise.
- For the first three weeks you will walk with two crutches. Move both crutches forward simultaneously, then the operated leg between the crutches and then the good leg.
- For the next three weeks, you will use one crutch on the non-operated side. Move the crutch and the operated leg forward together.
- After six weeks you may omit the crutches if possible.
Keep yourself upright when stepping and look straight ahead. When you turn, lift your feet. Do not rotate on the operated leg.
Try to gradually increase your walking distance. This can be done by going for a walk more and more often. The correct height of the crutches is important.
They are properly adjusted when you can support yourself with your hands on the handles and your elbows almost straight. It is also important that you place caps with a sufficient profile under the crutches so that you do not slip.
Avoid the risk of falling.
- Make sure there is enough room to walk.
- Remove loose items (eg electrical cords and carpets).
- Use a non-slip mat in the shower.
Stairs
Take the stairs step by step. Both feet are next to each other on the same step before you start the next step. With one hand you take hold of the railing, on the other hand you hold both crutches.
Upwards
Support yourself firmly on both hands and place the foot of the non-operated leg on the first step. Then place the crutch and foot on the operated leg there.
Downwards
First, place the crutch one step lower. Then place the foot of the operated side on the step where the crutch is. Then place the second foot next to the first.
Sleeping
It is important that your bed is high enough. If it is too low, it may make it difficult to get out of bed. It is ideal if the top edge of the mattress is above the bend of the knee. If the bed is too low, you can temporarily solve this by placing blocks under the legs of the bed, placing a double mattress or bringing a hospital bed into your home (you can obtain these and other aids from your health insurance fund). A mattress that is too soft is also not recommended. This will cause problems getting in and out of bed.
In bed
Sit on the edge of the bed just below the pillow. Push yourself up with both hands to sit further back until the knees are supported. Then rotate both legs and pelvis into the bed at once. Avoid sudden sideways movements.
Out of bed
Sit up and lean on both hands. Rotate pelvis and legs together toward the edge of the bed. Slide further forward until you can support yourself with both feet on the floor.
Possible aids for getting in and out
- Hook the feet together, with the foot of the healthy side passing under the foot of the operated side
- Use a sling (e.g. large towel), place it under the foot of the operated leg and place the leg in bed
- Do not cross the midline with the operated leg.
Sleeping position
Sleeping on your back is no problem. If you sleep on the right side, you should place a pillow between your knees. This prevents you from crossing your legs when you turn. Sleeping on the operated side is allowed, but this is often not possible during the first weeks
Sitting and Rising From a Chair
Sit down
Avoid sitting in a chair that is too deep or too low. If necessary, place another cushion on the seat. If you want to sit down, step back towards the chair or seat until you can feel it with the backs of your legs. Before sitting down, put both crutches away or hold both crutches in one hand. Then lean on the railing with both or one hand. Then place the operated leg one step forward and slowly sit down.
Getting up
Move to the edge of the seat. Make sure to move your operated leg slightly forward when standing up. Push off on the handrail. Do not push on your thighs. Never try to get up by pushing up on both crutches as this is unstable and could cause you to fall.
Washing
During the first weeks it is best to wash at the sink. After the wound has completely healed and the stitches have been removed, it is best to take a shower. To avoid wrong movements, it is better not to take a bath. Especially getting in and out can be the biggest problem during the first six weeks. In and before the shower, you can use an anti-slip mat. Installing a support bar on the wall can also help if you lose your balance. Placing a plastic stool in the shower cubicle helps to avoid having to stand for long. There are also seats, folding chairs that are attached to the wall. It is best to sit down when washing at the sink. Washing the feet will be a bit more difficult for everyone because bending deeply is not allowed. Help from a partner or a home nurse is recommended. You can also use a sponge attached to a long handle or a large towel that you wet and soap. It is best to use a large bath towel to dry off
Toilet
Dressing and Undressing
Household
Gardening
Sports
Walking is the best sport during rehabilitation. Gradually increase the distance according to your fitness level. Always watch out for unevenness on the sidewalk and for curbs outdoors. Avoid bumpy, slippery or soft bottoms at first.
You can start cycling on an exercise bike after three to four weeks, depending on your possibilities. After about six to eight weeks you can start cycling outside again. Men should start with a women’s bike because of the low entry. Always do this in consultation with your orthopedic surgeon, general practitioner or physiotherapist.
Swimming
Driving
For safety reasons, it is best not to drive by car yourself until after the check-up consultation with your doctor, usually six weeks after the procedure. After all, you must always be able to perform an emergency stop by law. Once you have regained sufficient control over your operated leg, you can drive again after six weeks. Please check the conditions of your car insurance beforehand.
You’ve done the research. Now let’s get the answers.
Surgery is a big decision. Dr. v d Watt is here to guide you through the details and create a plan tailored to your lifestyle.